
Photoshop: buat anak panah
Di Photoshop anda boleh membuat anak panah sendiri atau menggunakan bentuk pra-dibuat. Petua praktikal ini menunjukkan cara untuk mencari dan memasukkannya.
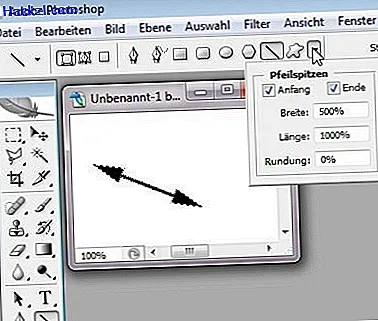
Buat anak panah di Photoshop - dengan "Alat Lukisan Talian"
- Pilih "Alat lukisan garis" dalam palet alat. Ini boleh didapati di menu di bawah alat teks. Untuk melakukan ini, tekan butang sehingga menu lungsur terbuka. Kemudian pilih alat yang sesuai.
- Pilihan alat kini dipaparkan di bawah bar tugas. Buka pilihan "Geometri" di sana. Untuk melakukan ini, klik pada segitiga kecil di sebelah kanan pemilihan bentuk.
- Sekarang periksa "Mula" dan / atau "Akhir" - bergantung pada tempat anda hendak melampirkan anak panah.
- Anda boleh mengawal bentuk dan saiz kepala panah menggunakan peratusan untuk "Lebar", "Panjang" dan "Penggenapan".
- Kemudian lukiskan garisan dalam dokumen anda. Anda kini akan menerima anak panah mengikut parameter yang ditetapkan sebelum ini. Sudah tentu, anda masih boleh menyesuaikan perkara ini.
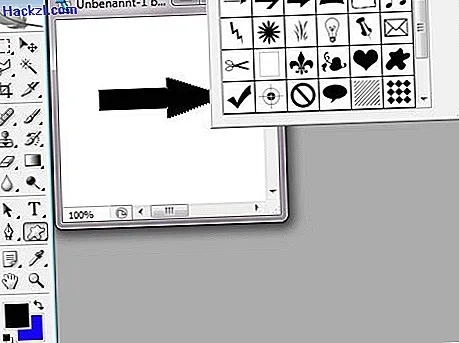
Buat anak panah di Photoshop - dengan "alat bentuk tersuai"
- Pilih "Alat Bentuk Sendiri" dari palet alat. Ini boleh didapati di menu di bawah alat teks. Untuk melakukan ini, tekan butang sehingga menu lungsur terbuka. Kemudian pilih alat yang sesuai dari ini.
- Di bar di bawah bar tugas, anda kini dapat melihat pilihan alat tersebut. Pilih bentuk anak panah yang anda mahu dari menu "Bentuk".
- Gunakan tetikus untuk menarik segi empat tepat saiz yang dikehendaki. Anak panah dibuat dalam bentuk dan saiz yang telah anda pilih.
Dalam artikel seterusnya, baca cara untuk mencuri kecacatan di Photoshop.