
Gimp: Komik warna - bagaimana ia berfungsi
Sekiranya anda ingin warna komik, karikatur atau lukisan monokrom dengan cepat, anda mempunyai alat yang baik dengan "GIMP". Perisian sumber terbuka dilengkapi dengan pelbagai alatan untuk membawa warna ke helaian. Baca di sini bagaimana untuk mendapatkan dari lukisan hitam-putih kepada imej warna siap.
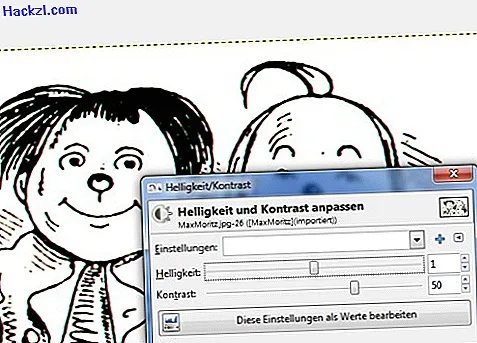
Penyediaan: Asal dalam hitam dan putih
Imej asal mestilah berwarna hitam dan putih tulen. Lukisan diimbas seringkali masih mempunyai kecacatan warna. Anda boleh membuangnya dengan meningkatkan kontras imej. Anda boleh melakukan ini melalui menu »Warna« -> »Kecerahan / Kontras« menggunakan gelangsar atau anda boleh menyesuaikan nilai warna melalui »Warna« -> »Curves«.
Ini adalah bagaimana warna datang ke dalam komik: Warna di lapisan oleh lapisan dengan GIMP
Simpan lukisan awal yang dioptimumkan dalam format GIMP .xcf supaya anda boleh bekerja dengan tahap yang berbeza seperti berikut:
- Pertama, lepaskan lukisan sebenar dari latar belakang. Untuk melakukan ini, buka menu "Warna" dan pilih "Warna untuk ketelusan". Dalam kotak dialog berikut, sahkan bahawa latar belakang putih harus digantikan dengan ketelusan.
- Akhir sekali, buat lapisan latar belakang putih yang baru menggunakan tetingkap lapisan atau item menu »Lapisan« -> »Lapisan Baru«. GIMP sudah mencadangkan nilai yang sesuai untuk anda.
- Ia masuk akal untuk mewujudkan tahap yang berasingan bagi setiap kumpulan elemen. Hanya duplikat lapisan telus seberapa banyak yang anda perlukan. Cara paling cepat untuk melakukan ini ialah dengan menggunakan pintasan papan kekunci SHIFT + CTRL + D, yang digunakan untuk menduplikasi lapisan aktif (diserlahkan dalam biru dalam dialog lapisan). Untuk Max dan Moritz dalam contohnya, ini adalah empat peringkat: latar belakang, muka, rambut, pakaian.

Ambil baldi cat dan berus!
- Cara terpantas untuk mewarna warna tertutup seperti latar belakang atau wajah dalam contoh adalah dengan alat "Isi" (ikon baldi cat). Adalah penting bahawa "Di belakang" dipilih sebagai mod mengisi supaya kontur karikatur atau lukisan dikekalkan. Anda memilih warna dengan mengklik pada kawasan warna di bawah kotak peralatan.
- Cara terbaik untuk mewarna kawasan yang lebih kecil adalah menggunakan alat berus. Pilih saiz berus yang sesuai dan pastikan bahawa "Di belakang" diaktifkan sebagai mod warna. Jika anda hanya bekerja pada satu tahap pada satu masa, tidak kira jika warna kehabisan kontur: Dengan alat "Penghapus", anda boleh dengan cepat mengeluarkannya.
- Sekiranya anda mahu menggambar lukisan atau manga yang berbeza, anda juga harus menetapkan aksen di kawasan warna seperti bayang-bayang atau kesan cahaya. Untuk ini terdapat alat "Dodge / Postexpose" di GIMP. Anda boleh menemuinya di dalam menu di bawah "Alat" -> "Alat Lukisan" atau mengaktifkannya dengan pintasan papan kekunci SHIFT + D.
- Sentiasa simpan kerja selesai anda dalam format XCF supaya anda boleh membuat perubahan dengan cepat kemudian. GIMP juga menyokong semua format imej biasa. Jika anda ingin menyimpan fail anda dalam format JPG atau PNG, anda perlu pergi melalui item menu »Fail« → »Eksport«.
Max dan Moritz diwarnakan dengan versi GIMP 2.8.6. GIMP adalah program pengeditan imej yang percuma tetapi berkuasa yang (hampir) hampir dekat dengan "Photoshop". Anda boleh mencari contoh tugasan yang menarik yang boleh berjaya anda menguasai dengan GIMP dalam petua praktikal kami.